How to Create a Tracking Plan, and Why It Matters
From my experience, most early-stage startups don’t create a tracking plan before setting up analytics. And even when they do, it’s usually a bad one.
I get it—startups move fast. A tracking plan feels like an extra step. So, you skip it, send data directly to your analytics tool, and start looking at reports.
But here’s what usually happens: messy data, missing insights, and wasted development time. Either you’re not getting useful insights from the tool, or you’ve given up on analytics altogether.
To avoid this mess, the first and most important step is creating a good tracking plan. There are other important parts of an analytics setup, but without a solid tracking plan, everything else just falls apart.
What is an Event Tracking Plan?
A tracking plan is a simple document—usually a Google Sheet or Excel file—that outlines what user actions (events) you want to track and what details (properties) to capture.
A tracking plan consists of two main components:
Events: User actions like signing up, clicking a button, or making a purchase.
Properties: Extra details that provide context for each event.
Most setups I see track events but miss out on properties. This limits how much useful data you can get.
Types of Properties in Mixpanel (and other product analytics tools too)
Event Properties
These are tied to specific events and help you understand the details of user actions.
Example: “What percentage of users choose a monthly vs. yearly plan when upgrading?”
Profile Properties
These are attached to users instead of events. They store the current state of a user and update it over time.
Example: “How many users are currently on a paid plan?”
Super properties
These are automatically attached to every event after being set, but they don’t update past events like profile properties do.
Example: “What plan was a user on when they posted their fifth Instagram post?”
Let’s say a user moves from a free plan to a premium, then to a pro. The upgrade event will have a property plan_type, which can be stored as:
An event property (specific to that upgrade action)
A profile property (stores the user’s current plan)
A super property (persists across all events after being set)
What Does a Good Tracking Plan Include?
A well-structured tracking plan makes your data useful. Here’s what it should cover:
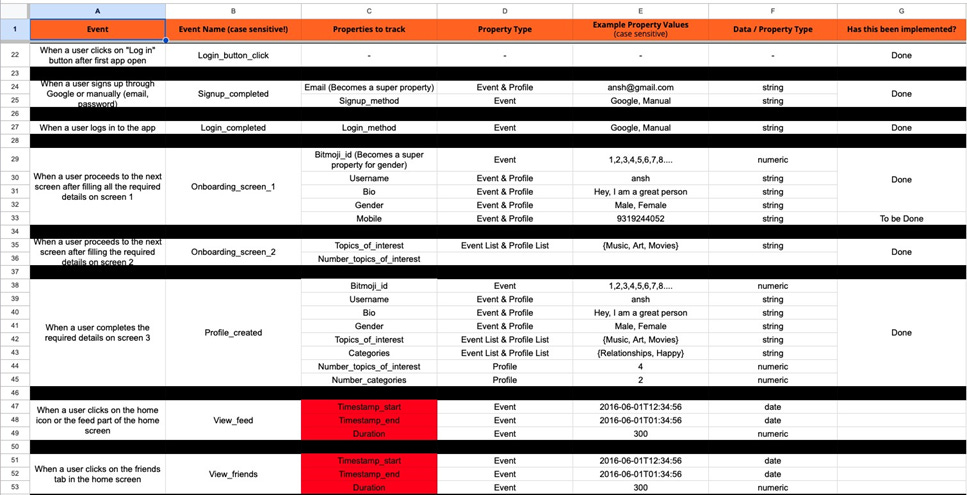
Event Trigger Describes when the event happens, like “When a user completes sign-up.ˮ
Event Name The name of the event, such as “Sign_up completed.ˮ
Properties/Data The data that goes with the event, like user email and sign-up method.
Property Type Defines if itʼs an event, super, or profile property.
Example Values Provides examples to guide implementation, like ansh@gmail.com for email.
Data Type Indicates what type of data it is, like strings for email.
Check out this sample tracking plan to see a practical application of the above.
How to Decide What to Track
You need to open your product (website/ app), go through different user flows, and list key interactions to track along with properties.
You don’t need to track everything—just the most important events that help you understand how users navigate your product.
Think about:
What features are important to your success?
What actions indicate conversion, engagement, or drop-off?
What insights do you need to improve your product?
A simple way to decide: If you don’t track a particular event, will you lose valuable insights?
How to Create a Great Tracking Plan
Scope Your Data Level Detail
Focus on tracking data that informs your decisions. You can add more tracking as needed.
Example: For a one-page form submission, start by tracking the "Submit form" action. If drop-offs occur, track more detailed field-level interactions later.
Naming Conventions and Casing
Choose between action-based (e.g., "clicking on sign-up button"), outcome-based (e.g., "landed on sign-up page"), or Object action (e.g., “Sign-up initiatedˮ) naming.
Stay consistent with naming and casing (e.g., camelCase) for clarity.
Structure Your Events Well
Your event structure should simplify, not complicate, your data analysis. Use a single event with properties for similar actions (can be classified under a single bucket), and use multiple events for non-similar actions (cannot be classified under a single bucket).
Example: In an e-commerce app, track "view product" with properties for the product viewed instead of creating separate events for each product.
In a SaaS app, track each feature using a separate event - rather than clubbing every feature into a single event.
Refer here to read about all the steps involved in a Mixpanel setup.
A good tracking plan makes or breaks your analytics setup. Invest a little time in doing it right, and it’ll pay off in better insights and better decisions.
About me
I’m Ansh, a Mixpanel Certified Partner. I’ve helped 60+ startups set up analytics and make data-driven decisions.
Curious about my work? Check out my website for case studies, testimonials, and more details about what I do.
Mixpanel course
This course is a deep dive into Mixpanel, covering every feature with real-world examples.
By the end, you’ll know exactly how to set up and use Mixpanel effectively. Each chapter includes both video tutorials and written guides, so you can learn in the format that suits you best.
Hope this was helpful. If you’re looking for any help on the mixpanel, amplitude, or posthog setup and getting insights out of it, feel free to reach out using any of the below methods.
LinkedIn | Email - anshdoesanalytics@gmail.com | Book a slot on my calendar


