Developer’s guide to implementing Mixpanel (client-side)
Navigating Mixpanel implementation can be scary, especially when digging through extensive documentation and deciding what and how to track.
Navigating Mixpanel implementation can be scary, especially when digging through extensive documentation and deciding what and how to track.
Lemme simplify it for you, into 4 steps:
Obtain your project token
Library installation & initialization
Tracking events, & properties
Ensuring accurate data flow into Mixpanel
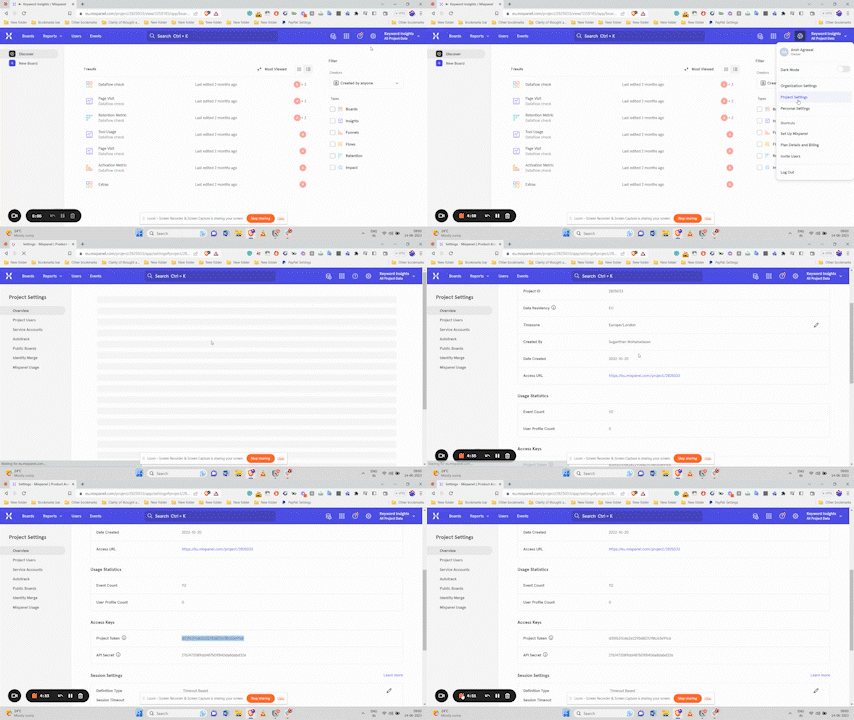
Obtain Your Project Token
Your project token is necessary for connecting your application to Mixpanel.
Here’s how to find it: Navigate to Settings → Project settings → "Access Keys" section → Copy "Project Token
Library installation & initialization
Mixpanel supports various libraries (JavaScript, Python, Node.js, React, Flutter, etc.).
Install and initialize the appropriate SDK for your product. You can find detailed instructions here.
Tracking events & properties
To send an event to Mixpanel, embed the tracking code in the function that handles the event. For example, to track user sign-ups:
mixpanel.track('Sign Up', {
  'source': "Google",
	'email': "ansh@gmail.com",
})
This example uses JavaScript; refer to this document for syntax variations across different libraries.
Understanding property types
There are multiple types of properties that you can send to Mixpanel, apart from event properties that are just attached to an event.
Let me take you through the most important ones:
Profile Properties: Attributes related to user profiles.
Super Properties: Attributes that automatically attach to all subsequent tracked events.
Incremental Properties: Properties that keep updating in value over time.
Here’s a detailed read on how these properties work, & their purpose.
To get the syntax for the above type of properties, refer to this documentation (the linked article is for JavaScript, but you can click on other libraries to get their syntax).
Note: Ensure you’re equipped with a tracking plan before you start implementing events. This plan will prevent analytics from becoming chaotic and save you time in future fixes.
Identity management
Identity management is one of the most important aspects of Mixpanel implementation, to ensure that your users are stitched together across platforms.
When a user signs up or logs in, call this function: .identify(<user_id>). When a user logs out, call .reset(). The user_id could be either the user’s email used for sign-up, or any unique identifier for a user.
All events before .identify is called are considered anonymous. However, Mixpanel SDK generates a $device_id that associates these events with the anonymous user.
When you call .identify(<user_id>), you're essentially telling Mixpanel that the $device_id belongs to a known user with the ID user_id. Mixpanel then does the heavy lifting and stitches the event streams of those users together.
Check out this documentation, to dive deeper.
Ensuring accurate data flow into Mixpanel
After implementing tracking, validate data flow:
Log into Mixpanel, navigate to the “Events” tab, and check if your events are appearing as expected.
Click on the '>' symbol next to an event name to verify if properties are correctly recorded.
Hope this was helpful. If you’re looking for any help with Mixpanel, feel free to reach out using any of the below methods.
LinkedIn | Email - anshdoesanalytics@gmail.com | Book a slot on my calendar


